To flush a water heater, you turn off the power or gas, shut the cold water supply, connect a garden hose to the drain valve, drain the tank until the water runs clear, then refill it before you turn the heat back on.
Most people can finish the job in under an hour with a hose and a flathead screwdriver.
I’ll walk you through how to flush water heater tanks, gas or electric, including the parts a lot of guides skip: letting the tank cool, refilling it properly, and what to do when the drain valve clogs.
Quick answer
- Turn off the power (electric) or set the gas control to off or pilot (gas).
- Close the cold water inlet valve.
- Connect a hose to the drain valve and run it to a drain or outside.
- Open a hot faucet in the house, then open the drain valve.
- Drain until the water runs clear, stirring up the sediment with short bursts of cold water.
- Close the drain valve, refill the tank, and let the air out through the hot faucet.
- Only then turn the power or gas back on.
Should you flush your water heater at all?
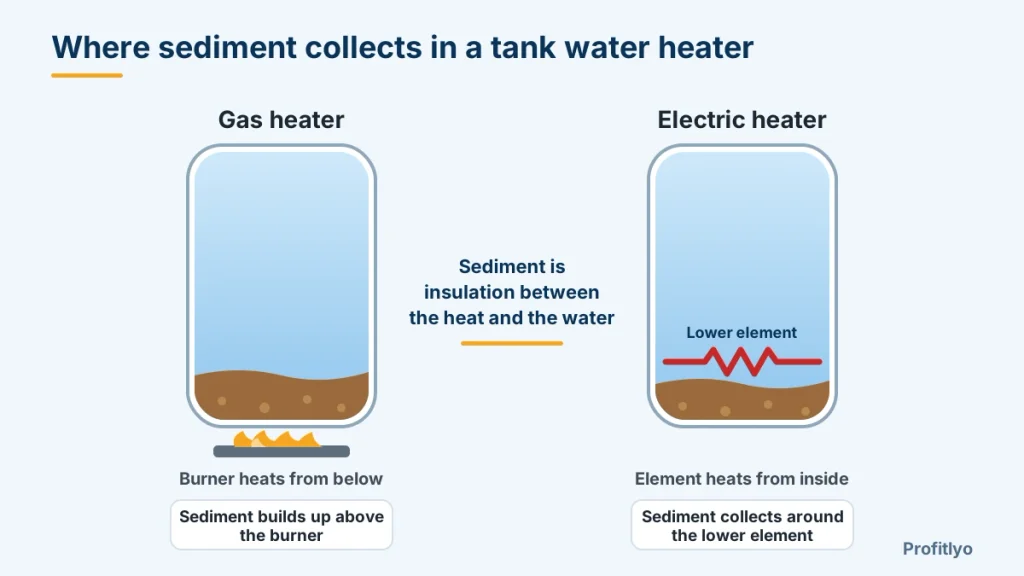
In most homes, yes. Minerals like calcium and magnesium settle at the bottom of the tank over time and form a layer of sediment. That layer sits between the heat and the water, so the heater has to run longer to do the same job. In a gas heater the sediment builds up above the burner. In an electric one it collects around the lower element.
How often you should do it depends on who you ask, and the advice really does vary. A. O. Smith says at least once a year. Rheem says once a year for most households and about every six months if you have hard water. Some other sources stretch it to every one to three years.
My advice is simple. Once a year is a sensible default.
If you have hard water, or you can see white or brown flakes when you drain it, do it every six months. Always check your manual too, because the manufacturer’s schedule is the one tied to your warranty.
Not sure if your water is hard? Hardness is graded by minerals per liter, and treating it has a price. I break down what a softener costs to buy, install and run in a separate guide.
If you have a softener, here is how to maintain a water softener.
Signs your tank is overdue
- Popping or rumbling noises when the heater is running
- Less hot water than you used to get
- Hot water that takes longer to come back after a long shower
- Cloudy, brown or rusty-looking hot water
- A drain valve that barely dribbles when you open it
- Energy bills creeping up with no change in how much hot water you use
Be careful with that list. Noises and low hot water can have other causes, like a failing element or a worn anode rod, so a flush is a good first step but not a guaranteed fix.
If your heater has stopped heating altogether, my guide on a water heater that stops heating shows how to find the cause.
One case where I’d hold off
If your heater is very old and has never been flushed, think twice. Sediment can end up plugging tiny corrosion holes in the tank, and cleaning it out can sometimes start a leak. Some plumbers advise against flushing a tank like that, and Rheem suggests calling a professional once a unit is around 8 to 12 years old. If that sounds like your heater, I’d have a plumber look at it first.
Safety first
Safety note: Water inside the tank can be hot enough to cause serious burns. Gas and electrical work can be dangerous. If you are not comfortable shutting off the gas, relighting a pilot or working near the breaker panel, stop and call a licensed plumber.
- Let the tank cool. If you can, turn the heater off a few hours before you start. Cooler water means less risk of scalding.
- Cut the power or gas first, every time. Running an electric heater with a half-empty tank can burn out the elements very quickly. For a gas unit, set the control to “off” or “pilot” and keep the burner from firing while the tank is draining.
- Wear gloves and eye protection. The water coming out can be hot and full of grit.
- Know where your main water shutoff is. If something goes wrong, you want to be able to stop the water fast.
What you’ll need
- A garden hose long enough to reach a floor drain or the outdoors (a washing machine hose works if a drain is close)
- A flathead screwdriver, for drain valves with no handle
- A bucket and a few old towels
- Work gloves and safety glasses
- Optional: an adjustable wrench, and a wet/dry vacuum for stubborn sediment
How to flush water heater tanks, step by step
Step 1: Turn off the power or gas
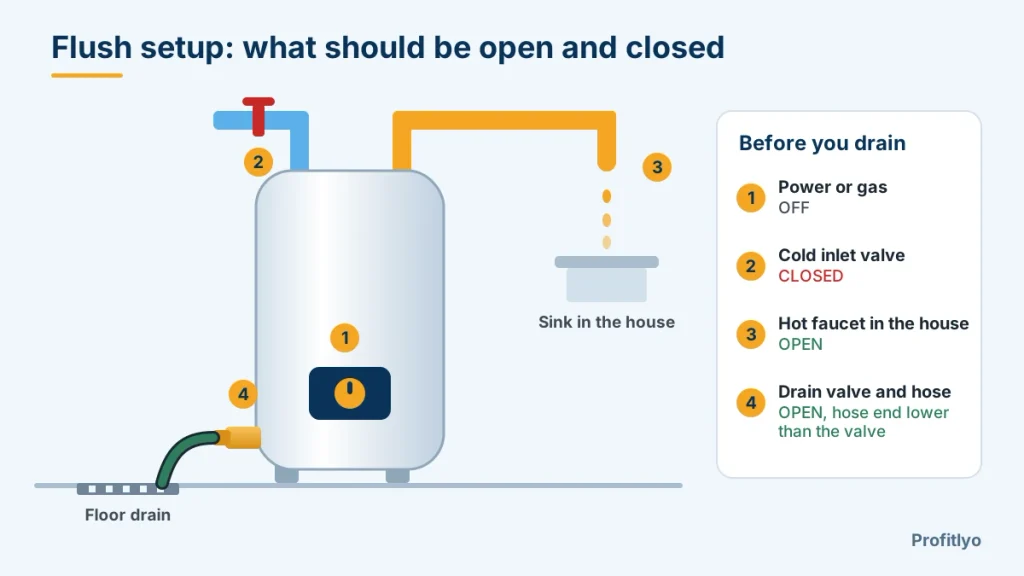
For an electric heater, switch off the breaker at the panel. For a gas heater, turn the control dial to “off” or “pilot,” depending on your model. If you are not sure, check the label on the tank or your manual. Then wait if you can. The longer it cools, the safer the whole job gets.
Step 2: Close the cold water inlet
Find the cold supply pipe on top of the tank. Turn the valve clockwise, or if it has a lever, turn it so the handle sits across the pipe. If your heater has no shutoff valve, you will need to shut off water to the whole house.
Step 3: Connect the hose
Screw a garden hose onto the drain valve near the bottom of the tank. Run the other end to a floor drain, a utility sink, or outside. The end of the hose has to sit lower than the valve, otherwise gravity won’t do the work. If there is no drain close by, a bucket works, but you will have to empty it a few times.
Step 4: Let air into the system
Open a hot water faucet somewhere in the house. Without this, a vacuum forms and the tank drains slowly, or not at all. Some guides tell you to lift the lever on the temperature and pressure relief valve for this. I’d rather use the faucet, since hot water can come out of that valve if you lift it.
Step 5: Open the drain valve and drain the tank
Turn the valve counterclockwise, by hand or with the screwdriver. Hold the hose firmly when it starts, because the water is under pressure and may be hot. The first water is often cloudy, brown or full of white flakes. That is the sediment you came for.
Some guides say draining a few gallons is enough. I prefer a full drain, because a few gallons only clears what sits right next to the valve. Draining alone often takes 20 to 40 minutes, longer if the tank is badly clogged with sediment.
Step 6: Stir up the sediment
Once the tank is empty, or close to it, briefly open the cold water inlet for a few seconds, then close it again. The burst of water stirs up the sediment at the bottom and pushes it out through the hose. Repeat that a few times until the water coming out looks clean. If your tank has heavy mineral buildup, it may never run perfectly clear. The goal is to get the loose sediment out, not to make the water look like it came out of a bottle.
Step 7: Close the drain valve
Close the valve and take the hose off. If your valve is plastic, tighten it by hand only. Overtightening can crack it, and then you have a leak and a new problem.
Step 8: Refill the tank and clear the air
With the hot faucet still open, open the cold water inlet again. The tank will start to fill, and the faucet will sputter as the air comes out. When the water runs in a steady stream with no sputtering, close the faucet.
Don’t skip this part. Turning the heat on before the tank is full can ruin an electric element in minutes.
Step 9: Turn the power or gas back on and check for leaks
Switch the breaker back on, or turn the gas control back to its normal setting and relight the pilot following the instructions on your heater. Then look at the drain valve and the pipe connections for drips. Check again after an hour. Allow some time for the water to heat up again, since you just refilled the tank with cold water.
What if the water won’t drain?
This happens more than you’d think, and it is usually sediment blocking the valve opening. Don’t force it. Try these in order:
- Make sure air is getting in. A hot faucet open in the house, or the pressure relief valve lifted carefully, breaks the vacuum.
- Pulse the hose. Step on the hose a few feet from the heater and let go quickly. The surge can knock the blockage loose.
- Back-flush it. Close the drain valve. Connect the hose to an outdoor or laundry faucet using a double-female hose coupler, turn that faucet on briefly to pressurize the hose, then carefully open the drain valve so water pushes back into the tank. Disconnect and try a normal flush again.
- Replace the valve. If it keeps clogging or leaks after you close it, the drain valve itself may be the problem. A brass valve is a good upgrade over a cheap plastic one. If you’re not comfortable doing that, it is a short job for a plumber.
Mistakes to avoid
- Leaving the power on. This is the one that costs real money, since it can destroy an electric element or damage a gas unit.
- Skipping the cold water shutoff. The tank keeps refilling as you drain it, and you never clear the sediment.
- Not letting the tank cool. Scalds from a drain hose are no joke.
- Turning the heat on before the tank is full. See Step 8.
- Forcing a stuck drain valve. You can snap it off, and then water is pouring out of a tank you can’t shut off easily.
- Expecting a flush to fix everything. It won’t fix a failed element, a leaking tank, or a worn-out heater.
When I’d call a plumber instead
- The drain valve won’t open, won’t close, or leaks
- You see heavy rust or corrosion around the fittings or the tank
- The noise keeps coming back after a flush
- The heater is 8 to 12 years old or more and has never been serviced
- You are not comfortable with the gas or electrical side
A professional flush usually also covers a check of the relief valve, the drain valve and the anode rod, which are worth looking at while the tank is drained anyway.
What about a tankless water heater?
A tankless unit doesn’t have a tank to drain, so you don’t flush it the same way. Instead you descale it, which means circulating a cleaning solution through the heat exchanger with a small pump and a set of hoses.
The steps depend on the model, so follow your manufacturer’s manual. My guide on how to maintain a tankless water heater walks through the full steps.
Frequently asked questions
How often should I flush my water heater?
Once a year is a good rule for most homes. If you have hard water, every six months is better. Check your manual for the schedule your manufacturer recommends.
How long does it take to flush a water heater?
Plan on 30 to 60 minutes for the whole job. Draining the tank on its own often takes 20 to 40 minutes, and it takes longer if sediment is slowing the flow.
Do I have to drain the whole tank?
Not always. Some guides say a few gallons is enough. I’d drain the whole tank for the best result, as long as you refill it fully before turning the power back on.
Can I flush a water heater myself?
For a newer gas or electric tank in good shape, yes. If the heater is very old, has never been flushed, or you are not comfortable with gas or electrical work, call a plumber.
What happens if I never flush my water heater?
Sediment keeps building up. The heater has to work harder, uses more energy, heats less evenly, and the tank and its parts tend to wear out sooner.
Why is my water heater still noisy after flushing it?
Some of the sediment may be hardened and stuck, or the noise may be coming from something else, like a failing element. If it persists, have a plumber take a look.
Final thoughts
A yearly flush is one of the cheapest bits of maintenance you can do on a tank water heater, and it takes less time than most people expect. Go slowly, shut off the power first, and refill the tank completely before you turn the heat back on. If anything feels off along the way, stop and call a plumber.
Next, I’ll be covering the anode rod, leaks from the bottom of the tank, and relighting a pilot light, since all three are worth knowing about once your tank is drained and you’re checking it over.